

In addition to paid advertising, Project Wonderful also allows you to advertise your store (or site / blog) for free. The system is based on bidding for positions on sites that display advertisements, but often on some sites the positions are not filled, so they are available for free use. The $ 0 bid is limited to a maximum of 2 days, so this bidding system will take you a little longer than when you advertise through a paid campaign, but the price in money is ideal for someone who starts out and has little or no budget 🙂
So the first step is to create your user account at http://www.projectwonderful.com. After logging in / creating an account, the first thing you need to do is create a new commercial. This is done by selecting the “Create a new ad” option:

When creating an advertisement, it is necessary to choose the size of the future advertisement. I chose 125 × 125, because most of the time on blogs that show ProjectWonderful ads, I come across this banner size. It’s a good idea to experiment with different ad sizes, to see which one will get you the highest clickthrough rate (CTR). Later, when I started to use advertising through campaigns more, it was easier for me to experiment since the campaign allows for bidding for multiple banners within a limited budget. Turns out, Rectangle 300x250px and Leaderboard 728x90px were the biggest percentage of clicks on my impressions. Probably because they get more attention with their size.

The following page provides details on the advertisement that is required. The link is the address you want the ad to go to. You can use the format I use (http://snis.etsy.com), or http://www.etsy.com/shop/snis Anyway 🙂 You can also use a direct link to only one category in your store.
Hover text is the text that will be displayed when someone hover over your ad.
Nickname is the name of the ad that you assign arbitrarily, and it helps you know what kind of ad it is when editing ads or in reports.
Image is an image you prepared earlier.
Rating is a categorization of an advertisement. I usually use C because all my commercials are safe for kids.

After creating the advertisement, it is necessary to publish the same. To bid with a newly created ad, you’ll need to select an option in “Manage my ads”:

You’ll see a list of ads. To the right, you have a “bid with this ad” link that is clickable. When you click on the “bid with this ad” option, you will be shown search criteria for sites where you can place your advertisement.

I do not change anything from the standard options offered. You can exclude specific regions if you don’t want to run an ad in, say, Europe. The following is filtering by the number of views in the last X days. I search everything.

As a result of the search, you will receive a list of sites where your ad can be displayed. Click on Current Bid to see the sites
sorted by posting price:
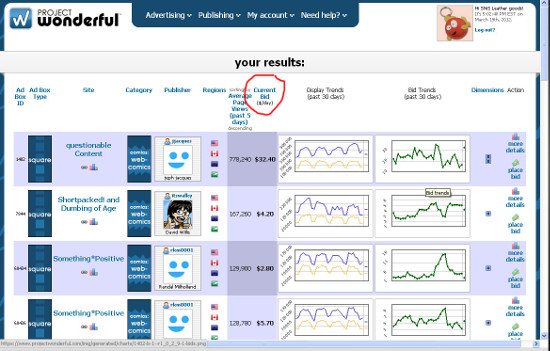
From the list, select the ones that are of interest to you and click on the “place bid” right next to the site. There are barely a few visits a day, up to a few hundred, to give free advertising. It needs to be reviewed sequentially. When you search, you can also choose to filter it to say at least 500 visits, etc.

Clicking on the “place bid” takes you to the next page, where you get other details about the page.
The Bids Accepted box indicates whether ads are approved manually or automatically.
In “More” you have what other banner sizes are available on that site.
Wining bids shows you what advertisements are currently being posted on that site.
You can look for each region individually.
The most important square is “Place your bid”. Enter 0 as an offer.

Then click on “Show more options?” To see more options for setting a bid.

This is where the time period for which you bid is changed. $ 0 bids are not allowed to be given more than 2 days, so you need to change 30 days to 2 days for the offer to be accepted. This is to ensure that everyone has equal opportunities to advertise for free 🙂
Leave the rest unchanged. You can change positions below if you don’t want your ad to appear in some positions.

Now we just have to confirm the offer.
The last option you can adjust is whether you want to be notified every time your ad is “outstripped” by a higher bid, or when it is published because it has the highest bid. If you mark that you want to be notified, then save yourself a lot of emails, as each advertisement will be overprinted or returned several times a day.

Finally you get a screen with the current status of your advertisement. As I posted an offer here on a site that is manually verified, the ad is pending for all regions.

You are not limited by the number of sites you can bid on, as well as the number of banner ads. You need to experiment with as many banners, websites, different sizes as possible
ads.
If you have started a blog that has been visited, or maybe you have your own site, you should also consider running Project Wonderful commercials on it. That way, you could earn money to pay for advertising your store on someone else’s site. Given that you would not have the extra investment in this case, it would be practical to turn out free advertising for your store.
If you like to listen to the best old music and old hits, visit our site
Our Radio Stations
